Grown-Up Goals. Kid-Sized Joy. Learning in disguise.

Write your text here...
Here are the best types of clay for a preschool classroom:
Air-Dry Clay (The Best for "Masterpieces")
This is real earth clay that has been treated to dry hard without needing a kiln (oven). It is the best choice for creating Fairy Garden houses or Pinch Pots.
Pros: Feels like "real" artist clay; very sturdy once dry; can be painted with tempera or watercolors.
Cons: It can be messy and leaves a dusty residue on hands and tables; it will shrink slightly as it dries, which can cause cracks if wrapped around a "core" like a glass jar.
Top Picks:
These air-dry clay brands are designed for children. They are safe, non-toxic, and conform to safety standards like ASTM D-4236. They are generally designed for kids aged 3+ to mold easily without needing baking, making them a popular choice for school projects and arts and crafts.)
Non Hardening Modeling Clay
It’s the lightweight, spongy modeling material that sticks to itself—not to little hands. Doesn't dry out, so they can shape and reshape!
Salt Dough (The Best Budget/DIY Option)
You can make this yourself with flour, salt, and water. It is a classic preschool staple.
Pros: Extremely cheap; non-toxic (though it tastes terrible!); can be baked in a low oven to speed up drying.
Cons: It is more prone to breaking than commercial air-dry clay; it can be grainy if the salt isn't fine.
Quick Recipe: 2 cups flour, 1 cup salt, 1 cup water. Mix and knead until smooth.
"Cloud" or Foam Clay (The Best for Sensory/Mess-Free)
This is a modern, super-lightweight material that feels almost like a marshmallow or stretchy dough.
Pros: Zero mess (it doesn't stick to hands or carpets); very vibrant colors; air-dries to a "squishy" foam texture that won't break if dropped.
Cons: It doesn't provide the same "resistance" for hand-muscle building as earth clay; it dries very quickly, so it must be kept sealed.
Top Picks:
Working with modeling clay is a major step up from playdough. While playdough is soft and squishy, clay offers resistance that builds incredible hand strength—a direct "workout" for the muscles children will later use for writing. It also introduces the concept of three-dimensional thinking (working in the round).
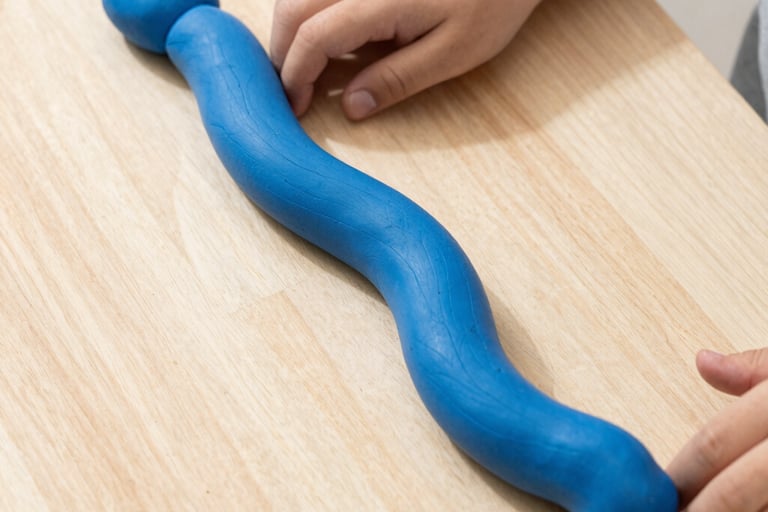
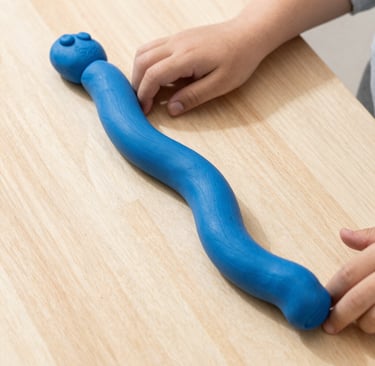
Before letting the children start, show them the "Snake Test." Roll a piece of clay into a "snake" (coil) and wrap it around your finger.
If it cracks, it needs a tiny bit more water.
If it holds its shape perfectly, it’s ready for a preschooler to sculpt!
The "Texture & Tool" Exploration
The Setup: Provide "real" clay (air-dry or earthen clay) and a variety of natural scoring tools: pinecones, sea shells, twigs, and smooth stones.
The Activity: Instead of making a "thing," encourage children to make "impressions." What happens when you press a pinecone into the clay? What pattern does the shell leave?
The Science: This introduces relief and texture, showing how one object can leave a physical "memory" in another.
The "Found Object" Sculptures
The Setup: A tray of "loose parts" like buttons, beads, feathers, and pipe cleaners.
The Activity: Children use the clay as a base to create "imaginary creatures" or "nature totems," sticking the objects into the clay while it's still wet.
The Art: This is mixed-media sculpture, encouraging children to see how different materials can work together.
Teacher’s "Nudge" Questions:
"I notice the clay feels heavy and cold. How does it change when you squeeze it in your warm hands?"
"Your tower is leaning a little bit. What could you add to the bottom to help it stand up straight?"
"If this creature lived in the desert we talked about, what kind of ears or tail would it need?"
The "Pro" Setup Checklist:
The Surface: Use canvas scraps or the "wrong" side of a piece of linoleum as a work mat. Clay won't stick to these surfaces like it does to a plastic table.
The Moisture Station: Keep a spray bottle of water handy. If the clay starts to "get sleepy" (crack or dry out), a little "rain" will wake it up.
The Storage: If they aren't finished, wrap the projects in a damp paper towel and place them in a Ziploc bag to keep them soft for tomorrow.
Why it Matters:
Clay is a "malleable" medium, meaning it can be changed over and over. This is great for children who are "perfectionists" because there are no mistakes in clay—you just squish it and start again.
Clay is one of the best "open-ended" materials for preschoolers because it provides significant sensory feedback and builds the hand strength necessary for later writing. Unlike playdough, real clay (or self-hardening clay) has a unique weight and texture that encourages "intentional" building rather than just squishing.
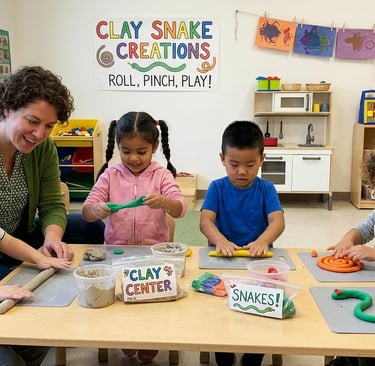
Clay Center Setup
To make a clay center successful for 3- to 5-year-olds, you need a defined space that can handle a bit of "dust" and moisture.
The Surface: Use canvas mats or the back of a piece of linoleum flooring. Clay sticks to plastic tables, but it peels easily off of fabric or textured surfaces.
The "Slip" Jar: Provide a small container of water with a sponge. Explain that water is the "glue" that helps two pieces of clay stay together.
Storage: Keep clay in a sealed airtight container with a damp cloth over the top to keep it pliable between uses.
The "Clay Construction" Challenge
The Setup: Provide small bowls of water (for "slip") and pre-cut cubes of clay.
The Activity: Show the children how to "score and slip" (scratch the surface and add a drop of water) to act as glue to join two pieces together.
The Engineering: This is a lesson in structural integrity. Children learn that a thin clay neck won't hold up a heavy clay head without a little bit of "engineering."
A Clay Sculpting Center is a major step up from playdough. While playdough is soft and squishy, clay offers resistance that builds incredible hand strength—a direct "workout" for the muscles children will later use for writing. It also introduces the concept of three-dimensional thinking (working in the round).
The Center: "The Little Sculptor’s Studio"
Before letting the children start, show them the "Snake Test." Roll a piece of clay into a "snake" (coil) and wrap it around your finger.
If it cracks, it needs a tiny bit more water.
If it holds its shape perfectly, it’s ready for a preschooler to sculpt!
The "Texture & Tool" Exploration
The Setup: Provide "real" clay (air-dry or earthen clay) and a variety of natural scoring tools: pinecones, sea shells, twigs, and smooth stones.
The Activity: Instead of making a "thing," encourage children to make "impressions." What happens when you press a pinecone into the clay? What pattern does the shell leave?
The Science: This introduces relief and texture, showing how one object can leave a physical "memory" in another.
The "Found Object" Sculptures
The Setup: A tray of "loose parts" like buttons, beads, feathers, and pipe cleaners.
The Activity: Children use the clay as a base to create "imaginary creatures" or "nature totems," sticking the objects into the clay while it's still wet.
The Art: This is mixed-media sculpture, encouraging children to see how different materials can work together.
Teacher’s "Nudge" Questions:
"I notice the clay feels heavy and cold. How does it change when you squeeze it in your warm hands?"
"Your tower is leaning a little bit. What could you add to the bottom to help it stand up straight?"
"If this creature lived in the desert we talked about, what kind of ears or tail would it need?"
The "Pro" Setup Checklist:
The Surface: Use canvas scraps or the "wrong" side of a piece of linoleum as a work mat. Clay won't stick to these surfaces like it does to a plastic table.
The Moisture Station: Keep a spray bottle of water handy. If the clay starts to "get sleepy" (crack or dry out), a little "rain" will wake it up.
The Storage: If they aren't finished, wrap the projects in a damp paper towel and place them in a Ziploc bag to keep them soft for tomorrow.
Why it Matters:
Clay is a "malleable" medium, meaning it can be changed over and over. This is great for children who are "perfectionists" because there are no mistakes in clay—you just squish it and start again.
Clay is one of the best "open-ended" materials for preschoolers because it provides significant sensory feedback and builds the hand strength necessary for later writing. Unlike playdough, real clay (or self-hardening clay) has a unique weight and texture that encourages "intentional" building rather than just squishing.
Clay Center Setup
To make a clay center successful for 3- to 5-year-olds, you need a defined space that can handle a bit of "dust" and moisture.
The Surface: Use canvas mats or the back of a piece of linoleum flooring. Clay sticks to plastic tables, but it peels easily off of fabric or textured surfaces.
The "Slip" Jar: Provide a small container of water with a sponge. Explain that water is the "glue" that helps two pieces of clay stay together.
Storage: Keep clay in a sealed airtight container with a damp cloth over the top to keep it pliable between uses.
The "Clay Construction" Challenge
The Setup: Provide small bowls of water (for "slip") and pre-cut cubes of clay.
The Activity: Show the children how to "score and slip" (scratch the surface and add a drop of water) to act as glue to join two pieces together.
The Engineering: This is a lesson in structural integrity. Children learn that a thin clay neck won't hold up a heavy clay head without a little bit of "engineering."
Clay Sculpting:
Here are the best types of clay for a preschool classroom:
Air-Dry Clay (The Best for "Masterpieces")
This is real earth clay that has been treated to dry hard without needing a kiln (oven). It is the best choice for creating Fairy Garden houses or Pinch Pots.
Pros: Feels like "real" artist clay; very sturdy once dry; can be painted with tempera or watercolors.
Cons: It can be messy and leaves a dusty residue on hands and tables; it will shrink slightly as it dries, which can cause cracks if wrapped around a "core" like a glass jar.
Top Picks:
These air-dry clay brands are designed for children. They are safe, non-toxic, and conform to safety standards like ASTM D-4236. They are generally designed for kids aged 3+ to mold easily without needing baking, making them a popular choice for school projects and arts and crafts.)
Non Hardening Modeling Clay
It’s the lightweight, spongy modeling material that sticks to itself—not to little hands. Doesn't dry out, so they can shape and reshape!
Salt Dough (The Best Budget/DIY Option)
You can make this yourself with flour, salt, and water. It is a classic preschool staple.
Pros: Extremely cheap; non-toxic (though it tastes terrible!); can be baked in a low oven to speed up drying.
Cons: It is more prone to breaking than commercial air-dry clay; it can be grainy if the salt isn't fine.
Quick Recipe: 2 cups flour, 1 cup salt, 1 cup water. Mix and knead until smooth.
"Cloud" or Foam Clay (The Best for Sensory/Mess-Free)
This is a modern, super-lightweight material that feels almost like a marshmallow or stretchy dough.
Pros: Zero mess (it doesn't stick to hands or carpets); very vibrant colors; air-dries to a "squishy" foam texture that won't break if dropped.
Cons: It doesn't provide the same "resistance" for hand-muscle building as earth clay; it dries very quickly, so it must be kept sealed.
Top Picks:
Working with modeling clay is a major step up from playdough. While playdough is soft and squishy, clay offers resistance that builds incredible hand strength—a direct "workout" for the muscles children will later use for writing. It also introduces the concept of three-dimensional thinking (working in the round).
Before letting the children start, show them the "Snake Test." Roll a piece of clay into a "snake" (coil) and wrap it around your finger.
If it cracks, it needs a tiny bit more water.
If it holds its shape perfectly, it’s ready for a preschooler to sculpt!
The "Texture & Tool" Exploration
The Setup: Provide "real" clay (air-dry or earthen clay) and a variety of natural scoring tools: pinecones, sea shells, twigs, and smooth stones.
The Activity: Instead of making a "thing," encourage children to make "impressions." What happens when you press a pinecone into the clay? What pattern does the shell leave?
The Science: This introduces relief and texture, showing how one object can leave a physical "memory" in another.
The "Found Object" Sculptures
The Setup: A tray of "loose parts" like buttons, beads, feathers, and pipe cleaners.
The Activity: Children use the clay as a base to create "imaginary creatures" or "nature totems," sticking the objects into the clay while it's still wet.
The Art: This is mixed-media sculpture, encouraging children to see how different materials can work together.
Teacher’s "Nudge" Questions:
"I notice the clay feels heavy and cold. How does it change when you squeeze it in your warm hands?"
"Your tower is leaning a little bit. What could you add to the bottom to help it stand up straight?"
"If this creature lived in the desert we talked about, what kind of ears or tail would it need?"
The "Pro" Setup Checklist:
The Surface: Use canvas scraps or the "wrong" side of a piece of linoleum as a work mat. Clay won't stick to these surfaces like it does to a plastic table.
The Moisture Station: Keep a spray bottle of water handy. If the clay starts to "get sleepy" (crack or dry out), a little "rain" will wake it up.
The Storage: If they aren't finished, wrap the projects in a damp paper towel and place them in a Ziploc bag to keep them soft for tomorrow.
Why it Matters:
Clay is a "malleable" medium, meaning it can be changed over and over. This is great for children who are "perfectionists" because there are no mistakes in clay—you just squish it and start again.
Clay is one of the best "open-ended" materials for preschoolers because it provides significant sensory feedback and builds the hand strength necessary for later writing. Unlike playdough, real clay (or self-hardening clay) has a unique weight and texture that encourages "intentional" building rather than just squishing.
Clay Center Setup
To make a clay center successful for 3- to 5-year-olds, you need a defined space that can handle a bit of "dust" and moisture.
The Surface: Use canvas mats or the back of a piece of linoleum flooring. Clay sticks to plastic tables, but it peels easily off of fabric or textured surfaces.
The "Slip" Jar: Provide a small container of water with a sponge. Explain that water is the "glue" that helps two pieces of clay stay together.
Storage: Keep clay in a sealed airtight container with a damp cloth over the top to keep it pliable between uses.
The "Clay Construction" Challenge
The Setup: Provide small bowls of water (for "slip") and pre-cut cubes of clay.
The Activity: Show the children how to "score and slip" (scratch the surface and add a drop of water) to act as glue to join two pieces together.
The Engineering: This is a lesson in structural integrity. Children learn that a thin clay neck won't hold up a heavy clay head without a little bit of "engineering."
Clay Center Cleaning Station
Since clay dries on hands and can be messy for sinks, set up a "Two-Step Wash" printable near the center:
The Bucket Dip: Dip your hands in the bucket of water and rub them together to get the big pieces off. (This prevents clay from clogging your plumbing!)
The Soap Scrub: Now go to the sink for a "sparkle scrub" with soap and warm water.
Suggested Clay Activities
The "Pinch Pot" Creatures
Skill: Developing the pincer grasp.
Activity: Show the children how to push their thumb into a ball of clay and "pinch" the sides to make a bowl. Once they have a bowl, they can flip it over to make a turtle shell, a ladybug, or a "cave" for a small figurine.
Texture Pressings
Skill: Exploring patterns and cause-and-effect.
Activity: Provide a tray of "texture tools"—pinecones, seashells, burlap scraps, and old keys. Have the children flatten a "pancake" of clay and press the items in to see what kind of "secret code" or pattern they leave behind.
Clay "Cakes" & Sculptures
Skill: 3D spatial awareness.
Activity: Provide birthday candles, beads, and cut-up straws. Children can build a "cake" and practice "decorating" it by poking the items into the clay. This is a great way to combine dramatic play with fine motor work.
Slab "Painting"
Skill: Hand-eye coordination.
Activity: Flatten a large slab of clay. Provide dull sticks (like coffee stirrers or chopsticks) and let the children "draw" into the clay. If they don't like their drawing, they can simply "erase" it by smoothing the clay over with their hand.
The Vocabulary of a Sculptor
Introduce these words while the children work to build their "artistic" language:
Pliable: "The clay is very soft and pliable today!"
Texture: "I see you added a bumpy texture to your dinosaur."
Slab: "You made a very flat slab of clay for your base."
Score: "We have to score (scratch) the clay before we add the water."
Quick Teaching Tip: The "Work in Progress": Since clay projects can take a long time to finish (and dry), create a "Work in Progress" shelf. If a child isn't finished with their sculpture, they can place it there under a piece of plastic wrap to keep it soft for the next day. This teaches them that art doesn't always have to be finished in one sitting!
Clay Center Rules
(Best used with photos or drawings next to each rule)
1. Keep the Clay on the Mat
Clay likes to stay on its "home" (the canvas mat or board). This keeps our tables clean and makes it easier to peel your art off when you are finished.
2. Use "Just a Dab" of Water
Water is our clay glue! If we use a little bit, it helps things stick. If we use too much, it gets "slippery-soupy."
Teacher Tip: Provide a small sponge in a cup of water rather than a bowl of water to limit the "soup" factor.
3. Roll, Pinch, and Poke
Use your strong muscles to roll "snakes" (coils), pinch "pots," and poke "textures."
4. "Work in Progress" or "Finished"?
Not done? Wrap it in a "blanket" (plastic wrap) and put it on the Green Shelf.
All done? Put it on the Drying Rack to get hard like a rock.
5. Dust Stays Down
We use our "gentle hands" when cleaning up. We wipe the crumbs into a pile rather than blowing them, so the "clay dust" doesn't get in our noses.
Activity Idea: Clay "Nature Prints"
For your 3- to 5-year-olds, combining the Fairy Garden interest with Clay is a perfect bridge.
Have the children collect "treasures" from their outdoor fairy garden (stiff leaves, acorns, evergreen sprigs).
Have them press these into a clay slab to create "Fossils from Fairyland."
Once dry, these can be painted with watercolors to make the textures pop.
Get in touch
Questions? Comments? Concerns?
info@joyfulletters.com
Affiliate Disclosure: Some of the links on this page are affiliate links. As an Amazon Associate, a Walmart Partner, and an affiliate for select educational brands, I earn a small commission from qualifying purchases. This never raises the price for you. I only recommend items that add true value to a play-based learning environment. Thank you so much for supporting our page!
© Joyful Letters 2025-2026 ALL RIGHTS RESERVED. Permission is given to reproduce for individual classroom use. Our content material is not to be resold.
Follow us on Facebook